| Afraid of the Dark |
 |
| Vision provided by all sources is extremely limited
except when in view of your camera. |
- Main structures (Hatchery, Command Center, Nexus, etc.) have
sight range {9/9/7/7}.
- The rest of structures have {4/3/2/2}, this includes Zeratul's
cannon projections.
- Units have 0 sight range. Upgrades and effects that increase
sight range provide bonus vision.
- Zeratul's Xel'Naga
Watchers (Observers) provide vision with Sensor Array upgrade
(3rd artifact + Contructs Bay) – 5.5 radius in normal mode, 8.5
in Surveillance mode.
- Stukov's Ocular Symbiote grants vision (5 radius).
- GDM Visor upgrade for Tychus' Fixers with max mastery grants
vision (1.5 radius).
- Nova's Elite Marines have 2 vision with Laser Targeting System
upgrade.
- Raynor's Scanner Sweep provides normal vision.
- Call in the Fleet (Han and Horner) requires vision for it to
be effective.
- Napalm Payload (from Strike Fighters) provide vision for it
duration (10s).
- Spotlight radius = 4+{7/6/3/3}*[1-((distance to the closest
friendly unit)/12)].
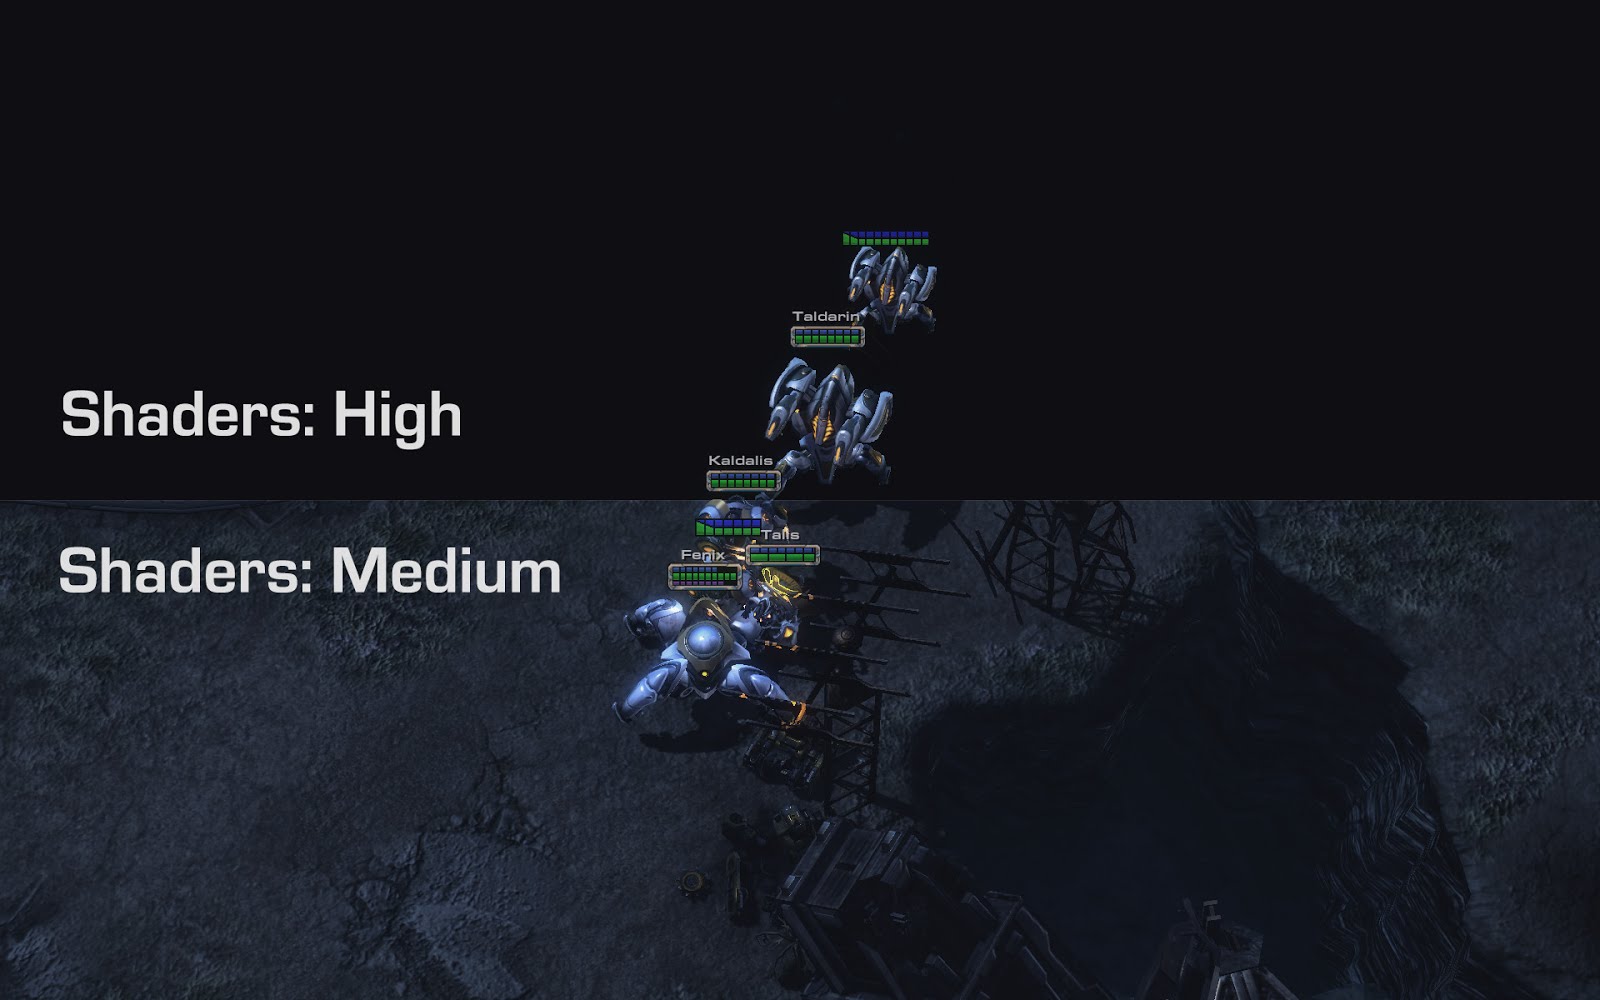
- Unexplored terrain is visible on low and medium shaders
(graphic settings).
« Back
|
| Aggressive Deployment |
 |
| Additional enemy units are periodically deployed onto
the battlefield. |
- Spawns are separate for each player.
- The first spawn is at {6:10/ 5:40/ 5:20/ 4:50}.
- Additional spawns each {4:10/ 3:50/ 2:50/ 2:10}.
- Drop locations prioritize player's units. Structures, workers,
Queens and units with 0 supply (majority of hero units and
calldowns) or units with no weapons are excluded.
- If no unit is found, drops are randomly spawned in (25,40)
distance from starting locations.
- If the randomly chosen unit, around which the drop pod will
spawn, has no valid ground pathing to the player's starting
location, the drop won't spawn at all. This way of preventing
drop pods from spawning is generally useful only for commanders
with good static defenses or hero only runs.
- Size and tech increase as time goes on. <Power, Tech>
levels: <1,1> → <2,1> → <3,2> → <4,2> →
<4,3> → <4,4> → <5,5> → <5,6>.
« Back
|
| Alien Incubation |
 |
| All enemy units spawn Broodlings upon death. |
- The number of Broodlings is equal to the unit's supply cost,
with the minimum of one.
- Broodling has 30 HP, light, biological and summoned
attributes; 4 damage, 6.2dps
« Back
|
| Avenger |
 |
| Enemy units gain increased attack speed, movement
speed, armor, life, and life-regeneration when nearby enemy units
die. |
- Each stack grants +10% attack speed, movement speed, life and
shields, 0.3 armor, 1 health and shield regeneration.
- The maximum number of stacks is 10.
- When a unit is killed, the number of stacks given equals to
the supply cost of the killed unit.
- The maximum effective distance, over which units can gain
stacks, is 1.25 edge-edge (not center-center).
- Mind-controlled/reclaimed units lose their avenger buff.
« Back
|
| Barrier |
 |
| Enemy units and structures gain a temporary shield
upon the first time they take damage. |
- Barrier triggers when units or structures are damaged.
- One-shot kills won't trigger the Barrier.
- 100 shield with 5s duration.
« Back
|
| Black Death |
 |
| Some enemy units carry a plague that deals damage over
time and spreads to other nearby units. The plague spreads to your
units when the enemy unit is killed. |
- Units lose 2% health per second (it ignores shields).
- Black Death interrupts out-of-combat healing (Nova's mastery,
Swann's upgrade, Horner's Endurance Training, etc. ) and Protoss
shield regeneration.
- Heroes will respawn without Black Death. Fenix's suit
switching will remove Black Death. Nova's basic health
regeneration is enough for her not to die.
- Workers on Kerrigan's Malignant Creep will out-regenerate
Black Death.
- Units in Nydus Worms don't take damage from Black Death. But
units in other transports will take damage.
- Units that die in transports (and carriers, bunkers,...) can
infect units around transport and transport unit itself. But
they won't infect other units inside transport.
- Infection range is 5.
- Enemy units have {5/10/20/33}% chance to carry Black Death.
- An infected unit can infect {1/1/2/3} other units upon death.
- Spider Mines can become infected when they unburrow.
- If Black Death is cycled out during Wheel of Misfortune, it
will be removed from enemy units but your units will keep it.
Furthermore, it will stick to heroes even after they respawn.
- Vorazun
strategy
« Back
|
| Blizzard |
 |
| Storm clouds move across the map, damaging and
freezing player units in their path. |
- Blizzard has 5 radius and 0.7 movement speed.
- It does 5dps and slows units' movement speed from -10% to -82%
after 5s.
- Stukov's Infested Bunkers can out-heal Blizzard when rooted.
- Blizzard becomes safe once they enter Mutator Safety Zones.
« Back
|
| Boom Bots |
 |
| Uncaring automatons carry a nuclear payload toward
your base. One player must discern the disarming sequence and the
other player must enter it. |
- Bots do not die on explosion. Bots are shown on the minimap.
- Digits are visible only to one player. And only the other
player can defuse the bot by selecting it and inputting the
correct number.
- Higher difficulties have more digits in the number: {1,2,3,4}
(casual, normal, hard, brutal)
- Correctly inputted digits stay visible and are shown in green.
- Incorrect input puts you on timer for {1,3,5,8} seconds before
you can try again.
- Incorrect input increases the bot's movement speed by {0,
0.25, 0.5, 1} with each incorrect input. The maximum bonus is
+4.75 movement speed.
- Boom Bots start at 1.25 movement speed.
- Boom bots spawn from random enemy structures. Timings on
Brutal:
| 2:30 (1 bot) |
11:30 (1 bot) |
| 4:00 (1 bot) |
13:00 (2 bots) |
| 5:30 (1 bot) |
14:10 (2 bots) |
| 7:00 (1 bot) |
15:20 (2 bots) |
| 8:30 (1 bot) |
16:30 (2 bots) |
| 10:00 (1 bot) |
..... |
- Nuke cooldown is 10s.
- Bots explode in the same way as Going Nuclear mutator – 750
(950 vs structure) damage (100% in 4 radius, 50% in 6 radius and
25% in 8 radius).
« Back
|
| Chaos Studios |
 |
| Mutators are chosen at random and periodically cycle
throughout the mission. |
- The list of rotating mutators.
- The first rotation is at 4:30. Then each after 1:45.
- There is 15s of downtime between the old mutator being
disabled and the new one enabled.
- Propagators, Slim Pickings and Mineral Shields can't be in the
first three mutators.
- Mutators can be chosen repeatedly, but can't be active
multiple times at once.
« Back
|
| Concussive Attacks |
 |
| Player units are slowed by all enemy attacks. |
- 50% movement speed reduction.
- 60s duration.
- Affects mobile structures as well.
- Medivac Pickup removes the debuff.
« Back
|
| Darkness |
 |
| Previously explored areas remain blacked out on the
minimap while outside of player vision. |
- Attack waves, main and bonus objectives are not visible on
the minimap unless you have direct vision on them.
- On Miners Evacuation, attacks targeting ships are visible on
the minimap.
- Void Rifts are still visible on the minimap.
« Back
|
| Diffusion |
 |
| Damage dealt to enemies is split evenly across all
nearby units, including your own. |
- The amount of diffused damage is {25/30/40/50}% of the
inflicted damage.
- Only damage dealt to Amon's units is diffused.
- Total damage is conserved.
- Damage is reflected in radius of 5.
- Diffusion does affect buildings.
- If the unit taking damage is killed, the killing damage won't
be diffused.
« Back
|
| Double-edged |
 |
| Your units also receive all the damage they deal, but
they are healed over time. |
- 100% of damage done is reflected.
- Structures are affected.
- The damage is healed with the rate of 8 HP and
shields/game second.
- Structure Overcharge, Sabotage Drone and Shadow Fury don't
reflect damage back.
- Zeratul's Cleave reflects only the damage dealt to the first
target.
- Void Apparitions don't reflect damage back to Ambusher.
- Zagara's Baneling Barrage doesn't reflect when it hits enemy
units, but it does reflect when it hits structures.
- Kerrigan is invulnerable for the majority of time when casting
Immobilization Wave. Only newly created units or units that are
far away—in distance from 26 to 31 (center-center)—will reflect
damage back.
- Carrier, Brood Lords and Swarmhosts don't take damage when
their spawned units deal damage.
- Abathur's Symbiotes don't reflect damage back to Ultimate
Evolutions.
« Back
|
| Eminent Domain |
 |
| Enemies gain control of your structures after
destroying them. |
- Destroyed structures have their life and shields fully
restored.
- Units in bunkers are captured as well.
- Nydus Worms or Uprooted Infested Bunkers can't be stolen.
- Stetellites won't be stolen, but they will be permanently
destroyed on their second death.
- Tesseract Projections will get stolen, but they have timed
life. Original Tesseract Cannons/Monoliths are unaffected.
- Flying terran structures will get stolen, but AI won't land
them.
- Stolen structures will try to produce units (random campaign
units).
- Structures won't be stolen if the they are killed by player
units. But letting your structures to burn down is still a way
to create walls.
- A structure won't be stolen if it would block Amon from
accessing player spawn location.
- Enemy will take over Nova's Spider Mines if they are killed
when burrowed. However, enemy can't take over Raynor's Spider
Mines.
« Back
|
| Evasive Maneuvers |
 |
| Enemy units teleport a short distance away upon taking
damage. |
- The maximum distance of teleport is 5.
- Units can't teleport for 2s after the last teleport and are
invulnerable for 0.25s
- Structures and heroic units won't teleport.
- Units under knock-back effect or without weapons won't
teleport either.
« Back
|
| Fatal Attraction |
 |
| When enemy units and structures die, any of your
nearby units are pulled to their location. |
- All pulls have 9 range.
- There are 3 types of pulls which depends on the supply cost of
the killed unit. [0,1] supply for weak pull, (1,6) for normal
and [6,∞) for strong one.
- Weak one pulls for 0.1875s, normal for 0.375s and strong for
0.625s.
- For this time and additional 0.1, 0.2 or 0.3 seconds
respectively, units have disabled all abilities and weapons, and
they are uncommandable.
- Units with 0 acceleration won't get pulled. That includes:
sieged tanks, detection and liberators; phasing conservators,
energizers and war prisms and most of burrowed zerg units.
- Burrowed Window Mine, Spider Mine, Infested Banshee, burrowed
Dehaka's Roach, Impaler, Hydralisk and Igniter are still
affected.
« Back
|
| Fear |
 |
| Player units will occasionally stop attacking and run
around in fear upon taking damage. |
- Chance for fear on hit = 100% * {5/10/15/20} / (target unit
max HP + max shields).
- The amount of damage doesn't affect the chance of getting
feared.
- 10s duration (5s for heroic units).
« Back
|
| Fireworks |
 |
| Enemies launch a dazzling fireworks display upon
death, dealing damage to your nearby units. |
- Upon death enemy units will launch as many fireworks as is
their supply cost, with the minimum of 1.
- Structures don't launch fireworks upon death.
- Each firework targets a random player unit—if there are any in
10 radius. Otherwise fireworks target a random point in ≤ 3
distance.
- There is an indicator where the missile will hit.
- Fireworks damage structures and both ground and air units for
50 damage in 1.5 radius.
« Back
|
| Gift Exchange |
 |
| Gifts are periodically deployed around the map. If you
don't claim them, Amon will! |
- Gifts spawn at 3 minutes and then every 2:10. After 20
minutes, the interval is 1:40 on hard and brutal difficulties.
- Gifts spawn at locations >40 from starting locations of
player 1, 2 and 3; and if there are no units close (<7).
- Claiming gifts takes 20s. Gifts are different for you and your
ally.
- Amon dispatches units to claim gifts.
- If players capture two gifts in a row, Amon will automatically
take the next one.
- Gifts for players:
- Vespene rain! – Vespene pickups around the
map
- Chrono Wave!
- A HERC! (for terran); A Scout!
(for protoss); A Queen! (for zerg) – free
unit
- MULE party! – mules and dancing oracles
- ... BECOMES AVENGER! – random unit gains 10
avenger stacks
- The Naughty List has been cleared! – clears
naughty list and reset kill count for units
- An Archangel!
- EVERYTHING IS FREE! (10s)
- Healing! (Available only after 8 minutes)
- Gifts for Amon:
- A Temporary Mutator! – for 3 minutes,
randomly chosen from: Transmutation, Just Die!, Mutually
Assured Destruction, We Move Unseen, Alien Incubation,
Outbreak, Concussive Attacks, Going Nuclear, Blizzard, Self
Destruction
- Hidden Threats! – spawns {10/15/25/30}
Widow Mines, Burrowed Banelings or Stasis Wards around the map
- Scourge! – If there are >5 air units
spawns Scourge, otherwise:
- Banelings!
- Hybrid! - summons hybrids
- A KILL BOT! – 30 kills (50 kills after
10:00)
- Overcharged Shuttles! – 80 dps
- Shrink Wave! – All player units are shrunk
for 60s. Units deal -50% damage and have -50% life and
shields.
« Back
|
| Going Nuclear |
 |
| Nukes are launched at random throughout the map. |
- There is warning sign for ~5s before a nuke drops.
- Nukes does 750 (950 vs structure) damage (100% in 4 radius,
50% in 6 radius and 25% in 8 radius).
- Each {7/5/3/2} seconds a nuke randomly drops on the map.
- Nukes avoid Mutator Safety Zones.
- Nukes won't drop if there are no player units in 50 radius.
« Back
|
| Hardened Will |
 |
| Enemy Heroic units reduce all incoming damage to a
maximum of 10 when any non-heroic enemy unit is near them. |
- The buff is active when there are enemy non-heroic units in
<6 distance.
- Heroic units will survive Dehaka's Devour with 1 HP, however,
Dehaka will receive bonuses from their attributes.
- Structures and Observers don't count.
« Back
|
| Heroes from the Storm |
 |
| Every attack wave will be led by Heroes of increasing
power. |
- Heroes are sent with most attack waves.
- Later waves can be accompanied by more heroes. One hero is
randomly chosen from the first three heroes, the second from the
second triplet and the last from the last triplet, and so on.
- On Temple of the Past, side attacks can have 1 hero at most.
Back air ramp won't spawn heroes, main ramp can have up to 6
heroes (global maximum).
- On Mist Opportunities, harass waves can have 1 hero at most.
- On Miner Evacuation and Scythe of Amon they typically do not
spawn at all.
- There is a hero pool from which heroes spawn (integer
variable). Each hero cost 1 to spawn, and won't spawn if the
pool is empty (0).
- The pool starts at value of 1, and is increased periodically.
(This is very similar to how I implemented it in my The Usual Suspects mutator)
Time
|
Increase
|
Time
|
Increase |
0:00
|
1 |
15:00
|
1
|
5:00
|
2 |
16:00
|
1
|
6:30
|
1 |
17:00
|
1
|
8:00
|
1 |
18:00
|
1
|
9:30
|
1 |
19:00
|
1
|
11:00
|
1 |
20:00
|
1
|
12:30
|
1 |
every 30s
|
1
|
14:00
|
1 |
|
|
- Spawn-camping no longer prevents heroes from spawning.
- All heroes have at least biological and heroic attributes.
Dehaka is the only hero that doesn't have "map boss" attribute,
and so the real Dehaka can Devour him.
- Heroes (apart from Dehaka) can't be put into stasis by Fenix's
Arbiter or Zeratul's Stasis Beam. Vorazun's Stasis Ward works on
all of them.
- Nova's Nuke and Kerrigan's Apocalypse are used only on hard
and brutal difficulties.
- All heroes are detectors.
Hero
|
Wave
|
Life
|
Abilities
|
Raynor
|
1 |
1000
|
Penetrating Round
|
Tychus
|
2 |
1000 |
Shredder Grenade
|
| Dehaka |
2 |
1500 |
Drag, Mend, Generate Spawns
|
| Karax |
3 |
750 x2 |
Warp Phase Cannon, Warp Khaydarin Monolith
|
| Nova |
3 |
2250 |
Snipe, Nuke
|
| Zagara |
4 |
2250 |
Baneling Barrage, Spawn Hunter Killers, Mass Frenzy, Roach
Drop
|
| Zeratul |
4 |
2000 x2 |
Blink, Void Armor, Shadow Blade
|
| Artanis |
5 |
2000 x2 |
Lighting Dash, Astral Wind, Resurgence
|
| Kerrigan |
5 |
5000 |
Leaping Strike, Psionic Shift, Apocalypse
|
« Back
|
| Inspiration |
 |
| Enemy Heroic units increase the attack speed and armor
of all enemies within a small range. |
- Inspiration is applied in 5 radius.
- It grants +25% attack speed and +3 armor.
- Affects both units and structures.
« Back
|
| Just Die! |
 |
| Enemy units are automatically revived upon death. |
- Enemy unit is invulnerable and stunned for 1s during reviving.
- All enemy units are revived—including map objectives.
- Enemy units don't trigger death effects when they are revived.
Death effects are triggered only after the final death (e.g. MAD
nuke, Biomass/Essence drop, Alien Incubation,..)
- Banelings are not revived. It doesn't matter whether they
explode by themselves or are killed.
« Back
|
| Kill Bots |
 |
| Offensive robots of a mysterious origin have been
unleashed on the Koprulu sector, intent on destruction. Through
cunning engineering, they are invincible until their pre-programmed
kill counter has been filled. After that occurs, they will shut
down. But can you survive for that long? |
- Kill Bots are spawned from random enemy structures.
- All bots are detectors, have 2.25 movement speed, 5 attack
range and have armored, mechanical, heroic and map boss
attributes.
- "Murder Bot" has 35dps and require 5 kills.
- "Death Bot" has 47dps, massive tag and requires 10
kills.
- "Kill Bot" has 58dps, massive tag and requires 15
kills.
- Kills are updated according to standard kill counter, plus
Banelings suicided on bots are counted too. Stasis Wards count
for kills.
- After 25 minutes, each 60s a wave of same strength is spawned.
| Time |
Spawn count |
Type (kills required) |
| 3:38 |
1 |
Murder Bot (5 kills) |
| 5:08 |
1 |
Murder Bot (5 kills) |
| 6:38 |
1 |
Murder Bot (5 kills) |
| 8:08 |
{1/1/2/2} |
Murder Bot (5 kills) |
| 9:38 |
{1/1/2/2} |
Murder Bot (5 kills) |
| 10:48 |
{1/1/2/2} |
Death Bot (10 kills) |
| 11:58 |
{1/1/2/2} |
Death Bot (10 kills) |
| 13:08 |
{1/1/2/2} |
Death Bot (10 kills) |
| 14:18 |
{2/2/3/3} |
Death Bot (10 kills) |
| 15:28 |
{2/2/3/3} |
Death Bot (10 kills) |
| 16:38 |
{2/2/3/3} |
Death Bot (10 kills) |
| 17:48 |
{2/2/3/3} |
Death Bot (10 kills) |
| 18:58 |
{2/2/3/3} |
Death Bot (10 kills) |
| 20:08 |
{1/1/2/2} |
Kill Bot (15 kills) |
| 21:08 |
{1/1/2/2} |
Kill Bot (15 kills) |
| 22:08 |
{1/1/3/3} |
Kill Bot (15 kills) |
| 23:08 |
{1/1/3/3} |
Kill Bot (15 kills) |
| 24:08 |
{1/1/3/3} |
Kill Bot (15 kills) |
| 25:08+ |
{2/2/3/4} |
Kill Bot (15 kills) |
« Back
|
| Laser Drill |
 |
| An enemy Laser Drill constantly attacks player units
within enemy vision. |
- Laser Drill has 1000 HP, 2000 shields, 2 armor; armored,
mechanical, structure, heroic and map boss attributes.
- It has 20dps for the first 15s, 40dps next 15s, 60dps after
that. Attacks ignore armor.
- Automatic repair takes 2 minutes.
- Spawns at the same location (Player 3's starting location).
- Mineral Shields provide vision as does Going Nuclear for a
short time. Units frozen in Temporal Field are revealed and
detected. Neither Missile Command, Time Warp, Blizzard, Lava
Burst nor Twister provide vision.
« Back
|
| Lava Burst |
 |
| Lava periodically bursts from the ground at random
locations and deals damage to player air and ground units. |
- Each {4/2/0.5/0.5} seconds a Lava Burst spawns on the map.
- Lava Bursts avoids Mutator Safety Zones and
buildings (>1). However, buildings can be damaged if it
spawns close. Truly safe are only 1x1 buildings like Toxic
Nests.
- Since player units have to be in at least 35 distance or
closer, the mutator is the most dangerous early on when player
units are limited to starting locations.
- Lava Burst starts dealing damage after 2s and they last
further 16s.
- Lava Bursts do 5 (7 vs armored) damage in 0.5 radius dealing
40 (56 vs armored) DPS.
- For heroic units the damage depends on hero's max health. From
+3 damage (100 vital), up to +60 (2000+ vital).
- On the Vermillion Problem, each time a unit is hit by a Lava
Burst, Donny starts talking.
« Back
|
| Life Leech |
 |
| Enemy units and structures steal life or shields
whenever they do damage. |
- Enemy units or structures heal for {25/50/75/100}% damage they
deal.
« Back
|
| Long Range |
 |
| Enemy units and structures have increased weapon and
vision range. |
- Enemy units and structures gain +3 sight range and ranged
weapons gain +3 range.
« Back
|
| Lucky Envelopes |
 |
| Festive envelopes containing resource pickups are
dropped at random throughout the map. |
- In the first 3 minutes, envelopes spawn each {5/5/6/7} seconds
and certain amount of them spawn only in ≤ 30 distance from
players' spawn locations.
- After the first 3 minutes, all envelopes will spawn all around
the map each {4.2/5/5.2/5.4} seconds.
- Each interval an envelope containing 50 minerals for both
players spawns.
- Every other interval an envelope containing 50 gas for both
players spawns.
« Back
|
| Mag-nificent |
 |
| Mag Mines are deployed throughout the map at the start
of the mission. |
- {50/100/150/200} Mag-Mines are spawned around the map.
- Spawns avoid starting locations (>30 distance), structures
(>1), resources (>5), Ulnar locks (>8) and Ji'Nara
(>15).
- Spawn require Amon's units in at least 25 distance.
- Mag-mines do 250 damage in 2.5 radius.
Mag-mines have 0.5 radius during flight.
« Back
|
| Micro Transactions |
 |
| Giving commands to your units costs resources based on
the unit's cost. |
- Hero units and Top bar abilities cost 10m/5g to command.
- Fenix suits cost 1 mineral to command.
- If the unit doesn't costs gas, the cost of command is 2*(its
supply cost) in minerals.
- If the unit costs gas, then the cost of command is 1*(its
supply cost) in gas and minerals.
- Minimum cost is 1 no matter the supply cost.
- If the player has 0 minerals, gas won't get subtracted.
- Commands are free if the player has no resources.
« Back
|
| Mineral Shields |
 |
| Mineral clusters at player bases are periodically
encased in a shield which must be destroyed for gathering to
continue. |
- Mineral Shields have 50 HP, 60s duration, structure attribute
and are generally not auto-targeted.
- Units that auto-target Mineral shields: Primal Host, Primal
Guardian's Explosive Spores, Mag-mines, Reaper's KD8 Charge,
Abathur's Symbiotes.
- Initial spawn is at {5:00/ 4:00/ 3:20/ 2:40}.
- Additional spawns each {4:00/ 3:00/ 2:30/ 2:00}.
- Minerals patches further than 15 from main buildings are not
affected.
- The chance for each mineral patch to be shielded starts at 10%
and increases by 5% each round. The chance starts at 100% in the
Wheel of Misfortune mutation.
- Mineral Shields benefit from Polarity, Barrier, Photon
Overcharge, trigger Fatal Attraction, and provide vision for
Laser Drill.
« Back
|
| Minesweeper |
 |
| Groups of Widow Mines and Spider Mines are buried
throughout the battlefield. |
- {50/75/100/125} Widow Mines and {70/105/140/175} Spider Mines
are spawned at the start of the mission.
- Spawns avoid starting locations (>30 distance), resources
(>10), Ulnar locks (>8) and Ji'Nara (>15).
- Spawns require Amon's units in 25 distance or closer.
- Widow Mine has 180 HP, 0 armor; light and
mechanical attributes. It has 5 range, 250 (+35 vs shields)
direct damage and 80 (+40 vs shields) splash damage in 3 radius.
- Spider Mine has 25 HP, 0 armor; light,
mechanical and map boss attributes. It deals 250 splash damage
(100% in 1.7 radius, 50% in 2.25, 25% in 3).
« Back
|
| Missile Command |
 |
| Endless missile bombardments target your structures
and must be shot down throughout the mission. |
- Standard missiles have 10 HP and deal 100 damage.
- Splitter missiles have 20 HP and deal 175 damage. If
destroyed, it spawns 2 Child missiles, each dealing 75 damage.
- Nukes have 100 HP and deal 300 (500 vs structure) damage (100%
in 4 radius, 50% in 6 radius and 25% in 8 radius).
- PDD has 15 HP.
- And all these have all 0 armor; mechanical and map boss
attributes.
- In the first 5 minutes, each {45/30/20/15} seconds 2 Standard
missiles are fired.
- Between 5 and 10 minutes, each {30/20/10/5} seconds 2 missiles
are fired (90% chance of Standard missiles, 10% of Standard
missile + PDD).
- Between 10 and 15 minutes, each {30/12/4/2} seconds 2 missiles
are fired (60% chance of Standard missile, 20% of Standard + PDD
and 20% of Splitter missile).
- After 15 minutes, each {15/6/2/1} seconds 2 missiles are fired
(40% chance of Standard missile, 20% of Standard missile + PDD,
30% of Splitter and 10% of Nuke with cooldown of
{--/--/2:00/1:00} with {-/-/2/5} PDDs).
« Back
|
| Moment of Silence |
 |
| When a Heroic enemy dies, all player units around it
will reflect on their transgressions, leaving them unable to attack
or use abilities. |
- Heroic structures doesn't trigger this effect.
- Effect is applied in 8 radius.
- It doesn't affect structures.
- There is 1s delay (2s if it's Nemesis Hybrid).
- 12s duration.
« Back
|
| Mutually Assured
Destruction |
 |
| Enemy Hybrid units detonate a Nuke upon death. |
- Hybrid Destroyers detonate a small nuke. The rest of hybrids
detonate normal nukes.
- Mirror images (P&P) don't detonate nukes.
- There is 1s delay (2s if it's Nemesis Hybrid and Moebius
Hybrid A - P&P).
- Nukes do 750 (950 vs structure) damage.
- Small Nuke does 100% in 2 radius, 50% in 2.5 and 25% in 3.
- Normal Nuke does 100% in 4 radius, 50% in 6 and 25% in 8.
« Back
|
| Naughty List |
 |
| Player units and structures take increased damage for
each enemy they've killed. |
- Units and structures take bonus x% damage for each kill they
score.
- 1–4 kills increase damage taken by 1% each. 5–14 kills by 4%
and 15–150 kills by 6%.
- So for example, units with 20 kills will take +80% damage,
with 50 kills +260% damage, with 100 kills +560% damage, and
with 150 kills +860% damage.
- Carrier, Swarmhosts, Ravens,... take increased damage when
their spawns kill units. Their spawned units don't take
increased damage.
- Respawned heroes take no bonus damage until they kill another
unit, then they take full bonus damage.
- Tesseract Cannons/Monoliths and their projections don't share
kills and debuffs.
« Back
|
| Orbital Strike |
 |
| Enemy Orbital Strikes are periodically fired
throughout the map. |
- Orbital Strikes deal 50 (100 vs armored) damage in 1 radius.
- They start {4/4/3/0} minutes into the game.
- And repeats after {3:00/2:20/1:50/1:20}.
- Orbital Strikes target units that are not in Mutator Safety Zones.
- They doesn't strike if there are less than 5 available targets
on the map.
- Orbital Strikes try to predict targets' future position based
on their current position, movement speed and orientation.
- Number of targets depends on the mission time: 10 targets
initially, after 5:00 - {1/2/3/3} targets; after 8:20 -
{2/3/4/4}; after 11:40 - {3/4/6/8} and after 16:40 - {3/5/8/10}.
- Orbital Strikes are fired in two volleys, each with 3 strikes
per target and some delay between them.
« Back
|
| Outbreak |
 |
| Enemy Infested Terrans spawn continuously around the
map. |
- Infested start to spawn at {2:50/ 2:20/ 2:10/ 2:00}.
- Infested spawn in waves every 25s from random enemy structure.
- One spawn is made of between {1/1/2/2} to {1/2/3/4} infested,
after 13:20 between {1/2/4/4} to {1/3/5/6}.
- At first, Infested Terrans are spawned [35 HP; light and
biological attributes, melee, 8 damage, 6.6dps]
- Between 6:40 and 20:00, Infested Marines are spawned [50 HP;
light and biological attributes, 5 damage, 4 range, 5.8dps]
- After 20:00 on Hard and Brutal, Aberrations are spawned [275
HP, 0 armor; armored, massive and biological attributes; 20 (40
vs armored) damage, 16.6 (33.3 vs armored) dps]
- After 15:00, Infested Medics spawn with each wave [50 HP, 1
armor; light and biological attributes, Infested Heal].
« Back
|
| Photon Overload |
 |
| All enemy structures attack nearby hostile units. |
- 16 DPS, 10 range (from the center of the building).
- 15s duration.
- Heroic structures cannot be overcharged.
« Back
|
| Polarity |
 |
| Each enemy unit is immune to either your units or your
ally's units. |
- Enemy structures and map objectives have Polarity too.
- Various crowd-control abilities work on all units, but they
deal no damage to shielded ones.
- Mind-control abilities don't work on polarity-immune units.
- Your units won't auto-attack immune units. However,
auto-casted abilities will be used on immune units.
- Propagators created from player units don't benefit from
Polarity.
- Just Die! will swap Polarity when triggered.
- On Scythe of Amon, units spawned from Rifts will have no
Polarity.
- On Oblivion Express, all trains cars in each train have the
same Polarity.
« Back
|
| Power Overwhelming |
 |
| All enemy units have energy and use random abilities.
|
- Available abilities: Psionic Storm, Guardian Shield,
Seeker Missile, Irradiate, Abduct, Fungal Growth, Graviton Beam
(Urun), Psi Orb, Time Warp, Vortex, Defensive Matrix, Point
Defense Drone, Disruption Web and Phase Shift.
- Urun's Graviton Beam can lift heroic and massive units.
- Vortex is used only on Brutal.
- Against structures are used: Point Defense Drone, Guardian
Shield, Defensive Matrix, Disruption Web and Phase Shift.
- Against units, Vortex and Disruption Web have lower chance of
being casted.
- If an enemy unit didn't have energy, it's given 50 starting
energy, 200 maximum energy and 0.5625 energy regeneration. But
it won't become susceptible to the Feedback ability.
- EMP works as units have to have at least 51 energy to cast
spells.
- All abilities cost 50 energy, but there is other logic behind
casting abilities. There is a global energy pool with
regeneration that increases with mission time. End each ability
costs energy from the global pool according to its power. This
limits the total number of spells, and thus balances between
different compositions and unit-spawning mutators.
- Global energy pool is separate for each player. Spells casted
from each pool will target only units of one player (although
splash will affect all player units). So for example solo will
be easier, as enemy will cast spells from only one energy pool.
- Units revert to normal when mind-controlled/reclaimed.
- Spells are casted even through Vorazun's Timestop.
- Enemy spells can target burrowed and invisible units even
without detection.
« Back
|
| Propagators |
 |
| Shapeless lifeforms creep toward your base,
transforming all of the units and structures they touch into copies
of themselves. |
- Propagators have {200/300/350/450} HP, 0 armor, heroic
attribute, detector ability and 1.6 movement speed.
- Propagators can hit both ground and air units/structures.
- Each new propagator has the same current HP as its parent
Propagator.
- First spawns around {5:48/ 4:58/ 4:08/ 3:28} from random enemy
building.
- Propagators spawn each {2:30/ 2:10/ 1:50/ 1:30}. After 8:20
mission time, the timer is reduced to {2:10/ 1:50/ 1:25/ 1:05}.
After 13:20 mission time, the timer is reduced to {2:10/ 1:40/
1:20/ 1:00}. After 20:00 mission time, the timer is reduced to
{2:10/ 1:40/ 1:05/ 0:50}.
- Spawn increase at 11:40 to {1/1/2/2} Propagators, at 18:20 to
{1/2/3/4} and at 23:20 to {1/2/4/5}.
- Result for Brutal difficulty:
| Time |
Spawn count |
Time |
Spawn count |
| 3:28 |
1 |
16:28 |
2 |
| 4:58 |
1 |
17:28 |
2 |
| 6:28 |
1 |
18:28 |
4 |
| 7:58 |
1 |
19:28 |
4 |
| 9:28 |
1 |
20:28 |
4 |
| 10:28 |
1 |
21:18 |
4 |
| 11:28 |
1 |
22:08 |
4 |
| 12:28 |
2 |
22:58 |
4 |
| 13:28 |
2 |
23:48 |
5 |
| 14:28 |
2 |
24:38 |
5 |
| 15:28 |
2 |
25:28 |
5 |
- And each 50s five more Propagators
« Back
|
| Purifier Beam |
 |
| An enemy Purifier Beam moves across the map toward
nearby player units. |
- Purifier Beam does 40dps (100% in 1 radius, 50% in 2.2 and 10%
in 2.8).
- It has 0.6 movement speed.
- Purifier Beam avoids Mutator Safety Zones in it's
random walk, but not when it's targeting a unit. In that case it
avoids minerals and commander starting locations.
- Additional Beams spawn on Hard and Brutal difficulties at 10
and 20 minutes.
- Beam can be trapped with Shield Batteries or by
patrolling units.
- Purifier Beam doesn't go after Stetellites.
- Purifier Beam does damage only to commander units/structures.
Other units/structures, for example mission objectives, are safe
from it.
« Back
|
| Scorched Earth |
 |
| Enemy units set the terrain on fire upon death. |
- Structures don't leave fire.
- Units with supply cost [0,1] leave small fire, with (1,4]
medium fire, and units with (4,∞) and hybrids leave large fire
upon death.
- Fires do 14dps to ground units and structures.
- Small fire lasts 15s with 0.25 radius, Medium fire lasts 30s
with 0.5 radius, and Large fire lasts 60s with 1.5 radius.
« Back
|
| Self Destruction |
 |
| Enemy units explode and deal damage to nearby player
units upon death. |
- Structures don't explode.
- There is 2s delay between unit's death and the explosion.
- The explosion deals 20 damage in 1.5 radius and hits both
ground and air.
- For units with supply cost >2, explosion is executed
(supply_cost +1) times.
« Back
|
| Sharing is Caring |
 |
| Supply is shared between you and your partner, and
units from both armies contribute to your combined supply cap. |
- Units reduce available supply from both commanders. And it's
the only effect of this mutator.
- Commanders still need to increase their available supply by
Pylons, Overlords, etc.
- Commander perks granting free supply or reducing supply caps
are unaffected.
- Ally doesn't benefit from these perks.
« Back
|
| Shortsighted |
 |
| Player units and structures have reduced vision range.
|
- Units and structures have reduced sight range by 60%.
- Raynor's Scans are not affected by this mutator.
« Back
|
| Slim Pickings |
 |
| Player worker units gather resources at a reduced
rate, but resource pickups spawn throughout the map. |
- Minerals are harvested by 1, compared to usual 5.
- Vespene is harvested by 1, compared to usual 4.
- Mules, Vespene Drones, Automated Refineries and Geysers
harvest 1 resource per tick.
- The maximum amount of minerals in a patch is reduced to 1500,
and stays reduced even if the mutator is removed. Gas geysers
are not affected.
- Both players receive the same amount of gas and minerals from
each pickup.
- There is 3x more minerals spawned than gas.
- Pickups doesn't spawn 7 or closer to enemy buildings.
- In the first 3 minutes, 33% of mineral pickups are spawned in
<30 distance from starting locations. After 3 minutes, all
pickups are spawned randomly around the map.
- In the first 3 minutes, pickups spawn at rate of {900/ 900/
750 / 643} minerals/minute and {300/ 300/ 250/ 214} gas/minute.
- After the first 3 minutes, pickups spawn at rate of {1071/
900/ 865/ 833} minerals/minute and {357/ 300/ 288/ 277}
gas/minute.
« Back
|
| Speed Freaks |
 |
| Enemy units have increased movement speed. |
- All movement speed is increased to the minimum of 5.5.
- Speed Freaks doesn't apply to Trains, Shuttles, Tornadoes,
Blizzards, Purifier Beams and Missiles from the Missile Command
mutator.
- Units revert their speed when mind-controlled/reclaimed.
« Back
|
| Temporal Field |
 |
| Enemy Temporal Fields are periodically deployed
throughout the map. |
- Units that enter a Temporal Field are disabled and their
timeflow is slowed to 1%.
- Heroic units are only slowed, their movement and attack speed
are reduced by 50%.
- Affected units are detected, revealed and can be attacked.
- Temporal Fields spawn each {8/6/4/3} seconds and stay clear of
Mutator Safety Zones.
- There is 1s delay before Temporal Field becomes active. Each
field is active for 20s.
- Temporal Field has 1.5 radius and affects both ground and air
units.
« Back
|
| Time Warp |
 |
| Enemy Time Warps are periodically deployed throughout
the map. |
- Units that enter a Time Warp have their timeflow slowed by
-66%.
- Time Warps are spawned each {8/6/4/3} seconds and stay clear
of Mutator Safety Zones.
- Time Warps are only spawned near (<50) players units.
- Time Warp has 3.5 radius and affects both ground and air
units.
« Back
|
| Transmutation |
 |
| Enemy units have a chance to transform into more
powerful units whenever they deal damage. |
- Enemy unit will transform every time after killing a player's
unit or structure. Enemy unit dealing damage has a chance to
transform = 100% * [Damage_Dealt / {500/400/300/200}].
- Spells and other abilities can cause the transformation just
as well as normal attacks. But one ability, attack or spell can
transform the unit only once.
- Enemy unit moves up through the list of transmutation tiers. If the unit is
not on the list, it's considered as Tier01.
- For killing a hero unit, the enemy unit moves straight to Tier
10. For killing another unit or structure, it jumps as many
tiers as the victim units supply cost or at least 1. For dealing
damage, enemy unit can move only one tier up.
- Once at Tier 10, enemy unit won't transform further.
- Unit type in a tier is chosen randomly.
- Transmutated units are technically new units, with full life,
shields and energy and without any buffs or debuffs the old unit
had.
- Structures, mission objectives and units with a map boss
attribute don't transform.
- Transmutated units provide more biomass, essence and
assimilated resources.
- Enemy units killing each other under Confusion doesn't trigger
transmutation.
- Transmutated units will seek and attack players' units until
they die.
- Unit can't transform more than once per second.
« Back
|
| Trick or Treat |
 |
| Civilians visit your Candy Bowl looking for treats,
which are generated by spending minerals. If no treats are
available, the civilians randomly transform into enemy units. |
- Civilians spawn from random enemy structures.
- In the first 6 minutes {1/1/2/2} civilians spawn every 30 AI
seconds, between 6-12 minutes {1/2/4/4}, between 12-18 minutes
{2/3/4/5} and after that {3/4/5/6} at the same time interval.
- Candy cost 25 minerals each, and the Candy Bowl can hold 50
pieces of candy. The Candy Bowl can't be added to a control
group.
- Every civilian consumes one candy.
- If there is no candy, civilians will transform. Newly
transformed units drop biomass, essence and triggers other
mutators as normal units.
- If a civilian can't find its way to the Candy Bowl, it will
transform after 5 minutes.
- Transformed units are chosen from the same transmutation tiers as in the
Transmutation mutator.
- The tier of newly transformed units depends on the game time.
- After 10 minutes, the transformed units are considerably
weaker.
| Game time [minutes] |
Tier |
Game time [minutes] |
Tier |
| 0-2 |
1-1 |
8-8.5 |
5-7 |
| 2-4 |
1-2 |
8.5-9 |
6-8 |
| 4-6 |
1-3 |
9-9.5 |
7-9 |
| 6-7 |
2-4 |
9.5-10 |
8-10 |
| 7-7.5 |
3-5 |
10+ |
0-1 |
| 7.5-8 |
4-6 |
|
|
« Back
|
| Turkey Shoot |
 |
| Supply can only be generated by killing turkeys that
wander throughout the map. Doing so may anger the turkeys that
remain. |
- Artanis, Dehaka, Nova, Tychus and Zeratul don't benefit from
their free max supply.
- The amount of available shared supply equals to the sum of
normal supply caps for each commander (e.g. Nova + Kerrigan will
have 100 + 200 = 300 available supply).
- Players still need to build Supply Depots/Pylons/Overlords.
- Turkey has 10HP, 8 damage (+8 vs structure)
and 1.5 attack period. Turkey provides 2 supply when killed.
- Infested Turkey has {75/100/125/150} HP; 1
armor; deals 70 damage to structures; 2 attack period; 6 range.
Infested Turkey does not provide supply.
- Turking has {200/2500/4000/6000} HP; 3 armor
and is detector. His Peck of Judgement deals 250 (+250
vs structure) in 0.4 area; 2 attack period; ground only; 1.4
range. Turking can fear units with Terrifying Gobble
in 11 area for 10s. Turking does not provide supply.
- Supply decreases by itself. The more supply you have, the
faster it decrease.
- Units will start taking damage if your supply used is higher
than available supply.
« Back
|
| Twister |
 |
| Tornadoes move across the map, damaging and knocking
back player units in their path. |
- Twisters do {5/10/15/25} damage in 1.3 radius.
- All units including heroic and massive units are knocked back
by Twisters.
- Twisters avoid Mutator Safety Zones and
spawn only in regions connected with pathing to player bases.
- When 2 Twisters get too close to each other, they will move in
opposite directions.
- The amount of spawned Twisters is (width + height of the
map)/19.
« Back
|
| Vertigo |
 |
| Your camera randomly changes positions. |
- Every {60/40/30/20} seconds camera changes.
« Back
|
| Void Reanimators |
 |
| Void Reanimators wander the battlefield, bringing your
enemies back to life. |
- Void Reanimators have 200 HP and 200 shields, 2.8 movement
speed, 0 armor and no attributes.
- First one spawns from random enemy building shortly after the
first corpses become available. The building they spawned from
has to have pathing to player 1 spawn location.
- Each next Reanimator spawns after {80/70/60/55} + 2–12
seconds.
- The maximum number of Reanimators on the map is {1/1/2/4}.
- The maximum number of corpses stored is 500. After that number
is reached, units with 2+ supply cost will randomly override
older corpse entries.
- Structures, workers, map bosses, map objectives, summoned
units and other Void Reanimators can't be revived.
- The cast time of the Reanimate ability depends on the supply
cost of the revived unit. [0,2) supply → 1.5s; [2,6) → 4s; [6,∞)
→ 8s.
- Propagators can be revived. Revived Propagators don't have
minimap icon.
- On Miner Evacuation, they do not reanimate infested from
waves.
« Back
|
| Void Rifts |
 |
Void Rifts periodically appear in random locations and
spawn enemy units until destroyed.
|
- Void Rifts have 500 HP, 1 armor; armored, heroic, structure
and map boss attributes.
- Void Rifts spawn at
| 2:20 (2 Rifts) |
8:20 (4 Rifts) |
| 3:50 (2 Rifts) |
9:50 (4 Rifts) |
| 5:20 (2 Rifts) |
11:20 (4 Rifts) |
| 6:50 (2 Rifts) |
each 1:30 (4 Rifts) |
- Void Rift spawns avoid starting locations (>30), resources
(>10) and other Void Rifts (>20). In the first 8 minutes
the distance from starting locations can't be higher than 80. On
the Lock & Load in the first 5 minutes, the pathing distance
can't be higher than 70.
- Void Rifts won't spawn if there are 4+ enemy units in 10
distance.
- Each Void Rift spawns a wave each {150/130/110/90} seconds.
The resource value of the wave starts at {100/100/200/300}, at
8:20 it increases to {200/200/400/600} and at 20:00 to
{400/400/700/1050}.
- Unit's resource value is its mineral cost + gas cost. The
total cost of each wave can be as high as indicated above or
slightly higher thanks to the last spawned unit.
- Units that can be spawned are:
| 1. Zergling |
8. Adept |
15.Void Ray |
| 2. Baneling |
9. Zealot |
16. Banshee |
| 3. Roach |
10. Stalker |
17. High Templar |
| 4. Hydralisk |
11. Siege Tank |
18. Raven |
| 5. Marine |
12. Immortal |
19. Infestor |
| 6. Marauder |
13. Ravager |
20. Hybrid Destroyer |
| 7. Hellion |
14. Mutalisk |
|
- At the start of the game, only units up to the number 10
(Stalker) can be spawned. After 10 minutes up to the number
{10/10/13/16}. And after 16:40 up to the number {10/15/19/20}.
- Apart from main waves, there is a small spawn from each Void
Rift each {21/18/15/12} seconds (in Custom Mutators
{42/36/30/24}). This small spawn consists of either 2 Zerglings
or 1 Marine or 1 Zealot. If it's the Zealot, the delay for the
next small spawn is doubled. (In custom mutators the options are
1 Roach, 1 Marauder or 1 Zealot without increasing the delay).
- Minimap visibility can differ based on texture settings
(should have been fixed, but can still behave inconsistently).
« Back
|
| Walking Infested |
 |
| Enemy units spawn Infested Terran upon death in
numbers according to the unit's life. |
- Contrary to the description, the number of Infested Terrans is
equal to the unit's supply cost, with the minimum of one.
- Infested Terrans have 35 HP; light and biological attributes,
8 melee damage, 6.6dps.
- Unlike Alien Incubation, Walking Infested doesn't trigger on
suicide-type deaths (Banelings, Missile Command hits,..)
« Back
|
| We Move Unseen |
 |
| All enemy units are permanently cloaked. |
- Structures are not cloaked.
- Hostile Map Objective units are cloaked too.
- Destructible Rocks aren't cloaked.
« Back
|